Pages

Wednesday, April 30, 2014

Dream Item of the Day

Have you seen this sweater?


Everyone is suddenly obsessed with it. I actually saw it in Neiman Marcus before the craze reached a fever pitch and vaguely remembered it from the runway. I loved it like whoa - it is so insanely lovely yet cool in person - yet thought it was kind of in that anomaly zone of being spring-looking yet maybe too warm to wear in spring/summer...but now I've seen it on humans paired with flowy maxi skirts on Fifth Ave and shredded white jeans on Abbot Kinney and I NEED it. It is versatile. And while $395 is nothing to laugh at, it seems somewhat reasonable for something you can style so many different ways - for the rest of your life. Yes, this is trendy and cool and right-now, but when will it not be? Get it here.

Tuesday, April 29, 2014

Kick Off To Summer - Self Tanner


Summer is right around the corner and now is the time to prepare. Hitting the beach with pasty, pale, skin is not ideal. I am a big believer in self tanner, glowing skin without harmful UV rays.

Self tanner can be tricky and you don't want to look orange or streaky. Follow these steps for a perfect look. 

1.) Take a shower and use a scrub head to toe. 
2.) Towel dry. 
3.) Apply a plain, unscented moisturizer to the driest areas of your body: elbows, knees and ankles.
4.) Let the moisturizer absorb into skin.
5.) Apply yourself tanner! (Apply it on top of the moisturized areas as well.)
6.) Wash the palms of your hands.

Before you can apply self tanner you will, of course, need to pick one. There are so many options; I will help you break it down.


Gels are the fastest option, they absorb and dry very quickly.


Mousse is very light and works great for oily skin. But be careful - the mousse can absorb into your hands, wear rubber gloves when applying. 


A spray will help you get even coverage on your hard-to-reach areas. 


Towels make everything easier and these also have an exfoliating effect! 


Self tanners with a gradual effect are the best for the mistake prone. But, you need to be diligent, they won't give you a deep glow. You need to use them more regularly.  


Happy tanning!


Perfectly Glossed Kisses,

Sutton


Tuesday, April 22, 2014

DIY Scrabble Letter Coasters

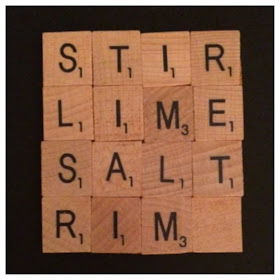
Over the weekend I made coasters out of scrabble letters. I had a house warming party and wanted to bring a gift. Coasters are the perfect gift, and hand making them is much more personal, not to mention cheaper.


All you need is a paintbrush, scrabble letters, cork, Mod Podge, glue, and an x acto knife, or scissors. You can buy everything on Amazon.


Step one: squirt some glue onto a piece of cork.


Step two: use the paint brush to smooth out the glue and start placing down the scrabble tiles. (Don't forget to wash your brush afterwards!) I used four tiles across and four tiles down. You can add more tiles for bigger coasters. I wrote out: stir, lime, salt and rim. I made four coasters in total, write out anything you want! They don't have to be about drinks, love, cute, your initials - use your imagination! 


Step three: after letting the glue dry, use the x acto knife (or scissors) to cut the cork, around the tiles.


Step four: drip some Mod Podge on top of the coaster and use your paint brush to smooth it. Make sure the Mod Podge gets into any spaces between letters.


Step five: let the Mod Podge dry and you're done. 


Perfectly Glossed Kisses,

Sutton


Friday, April 18, 2014

What We're Wearing April 18th, 2014


Okay, FINE, I admit it - my skin sometimes (aka often) gets oily. I always have oil absorbing sheets with me. Right now I'm using CVSoil absorbing sheets. As you can see, the cover looks worn because I keep them in my wallet. That way I never leave home without them!


Perfectly Glossed Kisses,


Sutton 


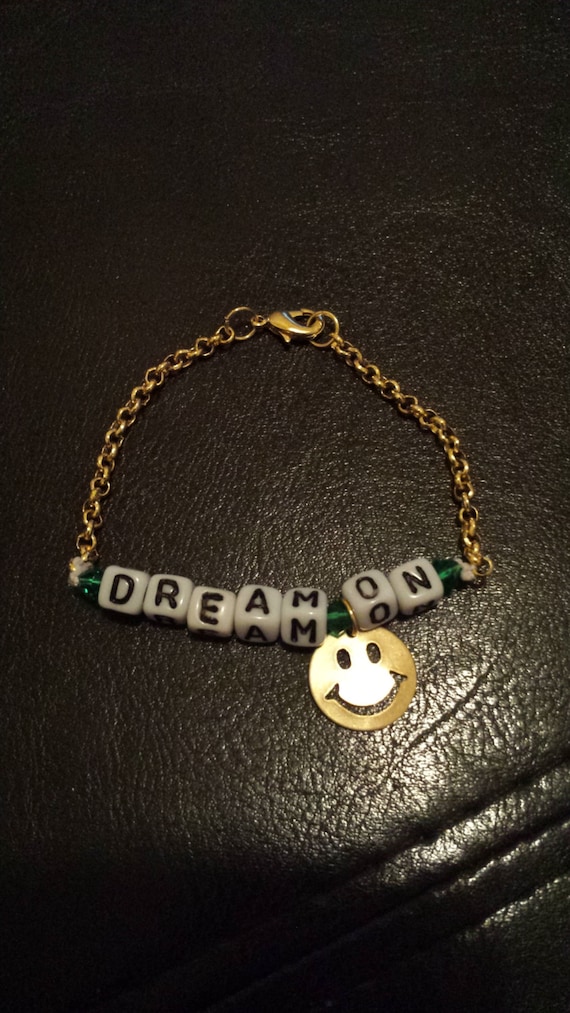
Today I'm wearing another one of my bracelets, this one has a real '90s feel. It totally makes me think of the smiley faces and BFF charms I used to sport from Claire's. A particular charm that said "I smile because I'm not really listening" under a coating of pink glitter comes to mind. This bracelet is - just slightly - more grown-up - and it's for sale on Etsy!

Dream On Bead and Chain Bracelet 

Handbags and Hugs,

Astor

Thursday, April 17, 2014

April 2014 Birchbox


As you know I'm obsessed with Birchbox and feel the need to convert you to be a Birchbox lover. No, Birchbox doesn't pay me to write these reviews and they haven't sent me a free one - I spend my own money (so there daddy!) and it's worth every penny! (Note - below pictures are the full size products.)


I got the Aquamarine Azulino shade. It is a pearly, pale blue. The hint of shimmer is very pretty.


This silver eyeliner is a fun twist. While it isn't a color I would wear every day, metallics can be fun. It also is easy to blend. 


This shampoo left my hair super smooth, and the scent is SO refreshing!


I had never tried any products by nyakio before and I am now in love. This face polish left my face very clean, yet soft. 


This scrub left my skin soft and summer-ready. Plus, loved the coffee scent - yum! 


This product is great for normal to dry skin. It is super hydrating, make sure not to use too much! 


Salty & sweet? Yes, please!


Are you still on the fence? Check out some of my past reviews:


If you have already jumped on the Birchbox bandwagon, then you probably are wondering what to do with all of the boxes they come in. Not to worry, I have the answer on how you should re-purpose your Birchbox.


Perfectly Glossed Kisses,


Sutton


Tuesday, April 15, 2014

Refinery 29 DIY Paint Project

I saw this DIY on Refinery 29 and needed to make one for myself. It is super easy and anyone can do it.

You just need paint, brushes, a canvas, scissors, and painters tape. (I am using their pictures.)


Start by painting different colors randomly across the canvas. There are no rules here. Use any colors, paint stripes, splotches, circles, whatever your heart desires!


Once you've covered the entire canvas let the paint dry completely - don't be impatient!


Next, cut your tape into even pieces and place them on the canvas. (I did a different pattern.)


After all of the tape is down, paint over the entire canvas (covering the tape). They used white tape, as did I. You can use any color, but I recommend white - it will really pop!


Again, let the paint dry completely, if you remove the tape before it's dry your painting will get messed up. Once the paint is dry carefully remove each piece of tape.

You're done!


I did a different pattern with the tape - arrows instead of rows.


Perfectly Glossed Kisses,

Sutton


Monday, April 14, 2014

Coveting for Spring...

...a pastel statement necklace from EK Thongprasert! I've been in love with these incredible, vibrant designs since first seeing them on Moda Operandi about two years ago. I'm currently hunting an affordable alternative, so stay tuned. But for now, here's dream fodder:

Ek Thongprasert  


$700 at Moda Operandi